PPR Pipe Leaks Solved Your 2026 Troubleshooting & Repair Guide

Pipe leaks in PPR, PE, and PVC systems demand immediate attention. Annually, water damage, including pipe leaks in residential and commercial properties, costs an estimated $13 billion in property losses in the U.S. This guide helps property owners quickly identify the source of these leaks. It equips them with the knowledge to effectively repair their PPR Pipe system and others. This prevents further damage and costly water loss.
Key Takeaways
- Understand your pipe material. PPR, PE, and PVC pipes have different traits. Knowing these helps you fix leaks correctly.
- Act fast when a pipe leaks. Turn off water and electricity first. Use temporary fixes to stop water damage.
- Find the leak’s exact spot. Look for wet areas. Use special tools for hidden leaks. This saves time and money.
- Repair leaks with the right tools. Use specific methods for PPR, PE, or PVC pipes. Follow steps carefully for a strong fix.
- Prevent future leaks. Check pipes often. Install them correctly. This keeps your plumbing system working well.
Understanding Your PPR Pipe System and Other Materials
Effective leak repair begins with a thorough understanding of your plumbing materials. Each pipe type possesses unique characteristics influencing its performance and repair methods. Knowing these properties helps you make informed decisions for lasting solutions.
Key Characteristics of PPR Pipes
PPR pipes, made from polypropylene random copolymer, offer superior mechanical strength and thermal stability. They feature a smooth inner surface, which significantly reduces friction and prevents scaling. This material also boasts excellent chemical corrosion resistance, effectively resisting most chemicals like acids, alkalis, and saltwater. PPR pipes maintain structural integrity at low temperatures, though freezing water inside them should always be avoided. They can withstand continuous temperatures up to 95°C, with short-term exposure possible up to 95°C. For long-term use, a maximum continuous temperature of around 70°C ensures longevity. This robust material is environmentally friendly and non-toxic, making it a reliable choice for various applications.
Key Characteristics of PE Pipes
Polyethylene (PE) pipes are rugged, flexible, and durable, often lasting over 50 years. They show high flexibility without compromising structural strength, absorbing mechanical stresses and ground movement without cracking. PE pipes are highly resistant to electrochemical-based corrosion and a wide range of chemical agents, including solvents and aggressive industrial fluids. Their lightweight nature simplifies handling and installation. Different types exist, such as HDPE, known for greater rigidity and strength, and PE100-RC, which offers enhanced resistance to slow crack growth and fatigue. PE100 RT provides increased resistance to higher temperatures, suitable for applications where ambient or fluid temperatures consistently exceed 50°C.
Key Characteristics of PVC Pipes
PVC (Polyvinyl Chloride) pipe is a synthetic plastic polymer known for its durability, cost-effectiveness, and ease of use. It is a lightweight yet strong material, capable of withstanding harsh environments. Its smooth interior surface promotes efficient water flow and minimizes buildup. PVC is non-reactive, providing resistance to corrosion and chemical damage, which significantly extends its service life. However, PVC is a thermoplastic material; its pressure capacity decreases as temperature increases. For example, Schedule 40 PVC, rated for 450 PSI at 73°F, may drop to 200 PSI at 140°F. Schedule 80 PVC, with its thicker walls, offers higher pressure ratings for industrial applications.
Common Failure Points for Each Pipe Material
Understanding common failure points helps you proactively prevent leaks and ensure system longevity. Each pipe material has specific vulnerabilities. Knowing these weaknesses allows for targeted maintenance and effective repairs.
PPR Pipe systems often experience leaks at joints and connections. Installation errors, material fatigue, and constant vibration frequently cause these issues. Thermal expansion and water hammer effects also stress joints, leading to eventual failure. Exposure to UV radiation and harsh chemicals can degrade the plastic polymers over time. Poor installation practices, such as incorrect fusion techniques or insufficient support, significantly contribute to early failures in PPR Pipe systems.
PE Pipe systems face challenges from corrosion and material degradation. Hydrogen sulfide gas can convert to sulfuric acid, causing internal corrosion. External factors like soil composition and groundwater chemistry also weaken pipes. Hydraulic surges and pressure transients, often called water hammer, create pressure spikes that crack joints and stress fittings. Poor installation practices, including improper bedding or inadequate backfill, create stress points. Ground movement and external stress from shifting soils also compromise durability. Pre-existing defects in the pipe can grow under operational loads, and material aging reduces performance over time.
PVC Pipe systems can fail due to manufacturing defects. These include incomplete resin fusion or weak extrusion knit lines. Defective installation is another major cause. Errors like over-belling, where the spigot inserts too far into the bell, can split the pipe. Improper soil conditions also contribute to failures. Operational issues, such as over-pressurization from water hammer or liquid column separation, also cause problems. Extreme pressure, shifting soil, or impacts from heavy machinery can lead to cracks, breaks, and leaks. Freezing water inside PVC drain pipes expands, causing splits or loosened joints.
Immediate Action for a Leaking PPR Pipe
A leaking pipe demands immediate attention. Swift action minimizes damage and prevents costly repairs. Property owners must prioritize safety and containment when a leak occurs.
Safety First: Shut Off Water and Electricity
Safety always comes first. Immediately shut off the main water supply to the affected area or the entire building. Robust water failure procedures detail water services, cross-connects, and service areas. These procedures specify locations and coverage areas for water shutoffs, along with necessary tools. They also identify which water systems are for potable, non-potable, fire-protection, and multipurpose use. Standard Operating Procedures (SOPs) are crucial for effective water shut-off strategies. These SOPs clarify alert meanings, specify notification recipients (SMS, email, dashboard), and define who responds during business hours versus after-hours. Never install shut-off valves on life safety systems like fire suppression. If the leak is near electrical outlets or appliances, turn off the electricity to prevent electrocution hazards.
Containing the Leak: Temporary Solutions
After securing safety, focus on containing the leak. Several temporary solutions can prevent further water damage until a permanent repair is possible. Pipe repair clamps offer immediate containment for small holes or cracks. They hold pressure up to 150 PSI. Proper sealing requires cleaning the pipe surface beforehand. Epoxy putty solutions provide another option. Knead the putty to a uniform color, then apply it generously around the leak, extending beyond the damaged area. It needs 30 minutes to cure before water pressure restoration and can last several months. For larger cracks, wrap a rubber sheet around the leak and secure it with multiple hose clamps, tightened evenly. This method is effective but requires regular monitoring due to potential slippage under high pressure. For minor leaks in PPR pipes, specialized PPR repair clamps serve as effective temporary fixes.
Assessing Initial Damage to Your PPR Pipe System
Once you contain the leak, assess the initial damage. Look for visible signs of water damage on walls, ceilings, and flooring. Document the extent of the water spread. Identify the exact location of the leak on your PPR Pipe system. Check for any structural damage or compromised materials. This initial assessment helps you plan the next steps for repair and mitigation.
Diagnosing the PPR Pipe Leak: Pinpointing the Problem
Accurately diagnosing a leak saves time and money. Property owners must employ systematic approaches to pinpoint the exact source of a leak, whether visible or hidden. Effective diagnosis prevents unnecessary repairs and ensures a lasting solution for your plumbing system.
Visual Inspection Techniques for PPR Pipe Joints
Visual inspection remains the first and most straightforward step in leak detection. Regularly inspect all accessible parts of the PPR piping system. Look for signs of moisture, water stains, or mold growth around pipe joints and fittings. These indicators often reveal hidden leaks. Trained inspectors identify surface defects such as uneven welds, discoloration, or misalignment. These defects may indicate deeper issues with joint integrity. Periodically check for visible signs of damage like cracks, bulges, or discoloration. Also, inspect all fittings and joints for signs of wear or leakage. Look for signs of mold or water damage around pipes and fittings; these can reveal concealed leaks.
Acoustic Detection for Hidden Leaks
When leaks remain hidden, acoustic detection offers a powerful, non-invasive solution. This method operates on the principle that fluid escaping under pressure from a pipe generates unique sound signatures. These acoustic signals travel through the surrounding medium. Their frequency and amplitude indicate the leak’s size and severity. Advanced signal processing techniques filter background noise and enhance the accuracy of detecting leak-related sounds. Specialized equipment like microphones, sensors, and data analyzers, including hydrophones for underwater detection, capture these acoustic signals.
An acoustic leak detector typically consists of a handheld device with a sensitive microphone or hydrophone. Operators place this device on the pipe or access points. The device amplifies the sound waves generated by the leak, converting them into an audible noise. Advanced systems use multiple sensors and correlation technology. They compare time delays between sensors, precisely calculating the leak’s location.
Acoustic detection offers significant advantages:
- Non-invasive: It eliminates the need for extensive digging or property disruption, making it practical for urban areas.
- High accuracy: It pinpoints the exact leak location, even in noisy environments, reducing repair time and effort.
- Efficiency: It surveys large areas quickly and identifies multiple leaks in a shorter timeframe.
- Cost savings: It detects leaks early, preventing water wastage and extending pipeline lifespan.
However, acoustic detection has limitations. Leaks in systems operating below 15–20 psi may not generate strong enough acoustic signals for detection, especially with background noise. Plastic or non-metallic piping, like PPR Pipe, absorbs and dampens sound, making leak detection harder compared to metal pipes. Ground microphones become less effective for pipes buried deeper than 7 or 8 feet, particularly in soft or loose soil. Noisy industrial environments can also overwhelm subtle leak signals, requiring experienced operators and potentially other technologies for reliable detection.
Pressure Testing Methods for System-Wide Leaks
For system-wide leaks, pressure testing provides a definitive diagnosis. The recommended pressure testing methods for identifying system-wide leaks in plumbing systems include hydrostatic testing and pneumatic testing.
Hydrostatic testing involves filling a pipe or vessel with water and pressurizing it to a specific level. The system is then monitored for a set period to detect leaks or structural weaknesses. This method is widely used for its safety and effectiveness, especially for testing large systems.
Pneumatic testing uses air or another gas to pressurize the system. It is often used for systems without water exposure or where detecting small leaks is critical. Pneumatic testing is faster than hydrostatic testing but requires careful handling due to the compressibility of gases.
Other effective methods for identifying system-wide leaks include:
- Electronic Leak Detection: This method uses specialized equipment to listen for the sound of water escaping from pipes. It is effective for leaks behind walls, under floors, and ceilings.
- Thermal Imaging: Infrared cameras detect temperature differences caused by water leaks, helping identify hidden leaks without damaging structures.
- Video Pipe Inspection: A camera is inserted into pipes to visually inspect for cracks, blockages, or leaks, providing a clear view of problem areas.
Identifying Specific Joint Types and Their Vulnerabilities
Understanding the specific joint types within your plumbing system helps pinpoint potential leak sources. Each material—PPR, PE, and PVC—uses distinct joining methods. These methods have unique vulnerabilities. Knowing these weaknesses allows for more precise diagnosis and effective repair strategies.
PPR Pipe Joint Vulnerabilities
PPR pipes primarily use heat fusion for connections. This method creates a homogeneous, strong bond when done correctly.
- Socket Fusion: This common method involves heating the outer surface of the pipe end and the inner surface of the fitting simultaneously. Technicians then quickly push them together.
- Vulnerabilities: Improper heating is a major issue. Underheating leads to a “cold joint,” which lacks full material integration and can easily leak. Overheating causes material degradation, weakening the joint. Misalignment during insertion also creates stress points, leading to cracks over time. Contamination on the pipe or fitting surfaces prevents proper fusion.
- Butt Fusion: This method joins two pipe ends directly by heating their surfaces and pressing them together.
- Vulnerabilities: Inadequate facing or cleaning of pipe ends leaves gaps or contaminants. Insufficient pressure during the fusion process results in a weak bond. Incorrect heating temperature or time also compromises joint integrity.
PE Pipe Joint Vulnerabilities
PE pipes offer flexibility and durability, utilizing several robust joining techniques.
- Electrofusion: This method uses fittings with embedded electrical coils. Applying current heats the coils, melting the pipe and fitting surfaces to create a strong bond.
- Vulnerabilities: Insufficient scraping of the pipe surface before fusion leaves an oxidized layer, preventing proper bonding. Contamination from dirt or moisture also weakens the joint. Incorrect fusion parameters (voltage, time) lead to under-fused or over-fused connections, both prone to failure.
- Butt Fusion: Similar to PPR, PE pipes use butt fusion for larger diameters.
- Vulnerabilities: Poor alignment of pipe ends creates uneven pressure distribution. Inadequate melt bead formation indicates insufficient heat or pressure. Dirty pipe surfaces or improper cooling times also compromise the joint’s strength.
- Mechanical Compression Fittings: These fittings use a nut, compression ring, and O-ring to create a seal.
- Vulnerabilities: O-ring damage or improper seating causes immediate leaks. Over-tightening the nut can deform the pipe or crack the fitting. Under-tightening results in a loose connection that leaks under pressure.
PVC Pipe Joint Vulnerabilities
PVC pipes are widely used due to their ease of installation, often relying on chemical bonding.
- Solvent Cementing: This method chemically welds PVC pipes and fittings together. The solvent softens the plastic, allowing the pieces to fuse.
- Vulnerabilities: Insufficient application of primer or cement leads to incomplete bonding. Applying too much cement can weaken the pipe material. Not allowing adequate curing time before pressurizing the system causes joint failure. Twisting the pipe during insertion can create weak spots. Using the wrong type of solvent cement for the specific PVC material also results in a poor bond.
- Threaded Joints: These joints use threaded pipe ends and fittings, sealed with tape or paste.
- Vulnerabilities: Over-tightening threaded joints can crack the PVC fitting. Under-tightening results in a loose connection that leaks. Using insufficient thread sealant or the wrong type of sealant allows water to escape. Cross-threading during assembly damages the threads, preventing a proper seal.
Tip: Always consult manufacturer guidelines for specific pipe and fitting types. Proper installation techniques are crucial for preventing future leaks.
Repairing Leaking PPR Pipe Joints
Property owners must address leaks in PPR pipe joints promptly to prevent extensive water damage and maintain system integrity. Effective repair requires the right tools, materials, and a precise approach.
Tools and Materials for PPR Pipe Repair
Successful PPR pipe repair depends on having the correct equipment. A specialized plumbing repair tool, such as the BL-TL302, effectively fixes holes from 7mm to 14mm, often caused by accidental drilling. This tool allows direct welding and can even repair leaks in elbows or three-way joints. The repair glue stick used with this tool consists of PPR (PP), ensuring compatibility with all PPR pipe fittings on the market for a reliable repair. Other essential tools include a pipe cutter, which ensures a clean cut for the damaged section. A deburring tool smooths the cut edges, preparing them for a proper fit. You will need PPR pipe fittings, like couplings or elbows, made from high-quality polypropylene, depending on the repair type. PPR pipes typically join using a special glue or, more commonly, a welding machine for a stronger, permanent bond. A measuring tape ensures accurate pipe cutting to the correct length.
Step-by-Step: Fusion Welding Repair for PPR Pipe Joints
Fusion welding provides a durable repair for PPR pipe joints. First, identify the exact location of the leakage. Examine the pipe for visible cracks, holes, or damaged areas, including joints, faucets, and valves. Next, turn off the water supply to the affected area, preventing further damage. Cut the damaged section using a pipe cutter or hacksaw, making a straight, clean cut through the PPR pipe. Prepare the ends of the remaining pipes by cleaning them with sandpaper or emery cloth to remove dirt, debris, or oxidation. If repairing a damaged section, install new fittings and connectors using a fusion machine, ensuring correct welding. Weld the pipes together using a PPR welding rod and fusion machine, ensuring no gaps or errors. The pipe and fitting are cut and cleaned to remove any dust or residue. Both ends heat simultaneously using special nozzles on the welding machine. Once softened, the pipe immediately inserts into the fitting socket and holds still for a few seconds to bond. The joint then cools naturally, forming a single, solid piece of plastic. Insulate the pipes by applying piping insulation tape or sealant around the joint for a tight seal, preventing moisture entry. Finally, turn on the water supply and check for any signs of leakage; repeat steps if leakage persists.
Emergency Clamp and Patch Solutions for PPR Pipes
When immediate fusion welding is not possible, emergency clamp and patch solutions offer temporary relief for leaking PPR pipes. These methods contain the leak until a permanent repair can occur. Specialized PPR repair clamps provide an effective temporary fix for minor leaks. These clamps typically feature a rubber gasket that seals around the leak when tightened. Epoxy putty solutions also offer a quick, temporary seal. Knead the putty until it reaches a uniform color, then apply it generously over the leak, extending beyond the damaged area. Allow it to cure for at least 30 minutes before restoring water pressure. For larger cracks, wrapping a rubber sheet around the leak and securing it with multiple hose clamps can provide a robust temporary containment. Regularly monitor these temporary fixes, as they are not permanent solutions.
Preventing Future PPR Pipe Joint Leaks
Preventing future leaks in PPR pipe joints requires a proactive approach. Property owners must implement consistent maintenance and adhere to proper installation practices. Regular inspections are crucial. They help identify potential issues before they escalate. Inspect all visible fittings, pipes, and joints every few months. Look for signs of wear, damage, cracks, discoloration, or deformation. Areas prone to temperature fluctuations need special attention. For larger systems, professional monitoring tools can detect hidden leaks or blockages.
Correct installation forms the foundation of a leak-free system. Install all fittings according to manufacturer guidelines. Use the correct tools and techniques, such as socket fusion or electrofusion. Ensure surfaces are clean and contaminant-free before joining. Avoid over-tightening or misalignment during installation. Essential tools include a pipe cutter for clean cuts, a heat fusion machine for seamless connections, and a deburring tool for smooth edges. Technicians must measure and cut pipes cleanly, deburr edges, and mark insertion depth. They heat both the pipe and fitting to the recommended temperature (around 260°C) using a heat fusion machine. Then, they quickly insert the pipe into the fitting, ensuring proper alignment, and hold it for a few seconds. Allow the connection to cool naturally. This creates a seamless, leak-proof joint. Avoid common mistakes like incorrect heating time, misalignment during fusion, skipping deburring, or rushing the cooling process. These errors weaken the bond.
Manage temperature exposure effectively. Insulate systems in areas with freezing conditions or excessive heat. Monitor hot water systems to ensure operation within recommended temperature limits. Extreme temperatures weaken the material. Protect fittings from prolonged UV radiation exposure if installed in sunny areas. UV rays degrade the material over time. Avoid exposing fittings to harsh chemicals or solvents. These substances cause damage. Maintain consistent water pressure to prevent stress on fittings. Keep pipes clean by flushing them with water. Install and regularly clean strainers or filters to prevent debris buildup. For complex issues or extensive damage, rely on professional plumbers experienced with PPR systems. They prevent improper repair techniques and ensure lasting solutions.
Repairing Leaking PE Pipe Joints
Property owners must address leaks in PE pipe joints effectively. This ensures the longevity of the plumbing system. Proper repair techniques prevent further damage and maintain system integrity.
Tools and Materials for PE Pipe Repair
Successful PE pipe repair requires specific tools and materials. You need a pipe cutter or saw to remove damaged sections. Sandpaper or emery cloth cleans and roughens the pipe surface. This ensures better adhesion for repair materials. A PE pipe repair kit often includes a repair sleeve and adhesive. It also provides instructions for a complete repair. A clean rag or towel wipes the pipe before applying any repair materials. Safety gloves and goggles protect your hands and eyes during the process. For leaks at tees, polyethylene pipe repair fittings replace damaged sections. Clamps secure barbed fittings into the pipe. Experts recommend two clamps per side for extra hold, staggered for better tension. Lubricants like WD-40 or liquid soap ease the insertion of barbed fittings.
Step-by-Step: Electrofusion and Butt Fusion Repair for PE
Electrofusion and butt fusion offer robust repair solutions for PE pipes.
- Prepare and Clean the Pipe: Thoroughly clean the inside and outside of the pipe ends. Use a lint-free cloth to remove dirt and debris. For butt fusion, only clean the ends adjacent to the weld. Facing will remove material. Electrofusion requires an alcohol solution for cleaning the pipe ends.
- Align and Clamp: Securely clamp the pipe ends into the fusion equipment. Ensure precise top-to-bottom alignment. A seamless transition without gaps or ridges should exist when you push the ends together. Adjust alignment by tightening the higher side.
- Face the Pipe: Use the fusion machine’s facing tool. This creates a clean, smooth, virgin surface on the HDPE pipe ends. Mount the tool between the pipes. Slide them into place. Begin facing until the process completes.
- Inspect and Clean (Post-Facing): Remove excess pipe shavings. Avoid touching the clean ends. This prevents contamination from skin oils or debris. Re-check alignment. If unsatisfactory, realign and re-face.
- Heat and Fuse: Confirm the heating plate is at the correct temperature (typically 400-450 degrees Fahrenheit). Carefully place the heating plate between the faced ends. Gently bring the pipe ends into contact with the plate. Lock them in place for a ‘heat soak’ period. This period depends on pipe diameter and thickness. After the heat soak, release the lock. Pull the pipes apart. Quickly remove the heating plate. Inspect the melted ends. Ensure they are smooth, completely melted, and flat. If concave, restart the process after cooling.
Mechanical Compression Fittings for PE Pipe Repair
Mechanical compression fittings provide a quick and reliable repair for PE pipes. These fittings do not require specialized fusion equipment. They use a simple compression mechanism to create a watertight seal. You cut the damaged section of pipe. Then, you slide the compression fitting onto the pipe ends. Tighten the nuts on the fitting. This compresses an internal gasket against the pipe. This creates a secure and leak-free connection. Ensure you use the correct size fitting for your pipe diameter. Over-tightening can damage the pipe. Under-tightening can lead to leaks.
Preventing Future PE Pipe Joint Leaks
Property owners prevent future PE pipe joint leaks through proactive measures. They ensure the longevity and reliability of their plumbing systems. Implementing consistent maintenance and adhering to proper installation practices are crucial.
First, always prioritize correct installation. Technicians must follow manufacturer guidelines precisely for all PE pipe and fitting installations. They use the correct fusion equipment and techniques, whether electrofusion or butt fusion. Proper preparation of pipe ends, including cleaning and facing, ensures strong, homogeneous bonds. Avoid common installation errors like insufficient scraping, contamination, or incorrect fusion parameters. These mistakes significantly weaken joints and lead to premature failure. Donsen, a leader in plastic pipeline solutions, emphasizes the importance of precise installation for optimal performance.
Second, select high-quality PE materials. Inferior pipes and fittings often contain hidden defects. These defects can develop into leaks under operational stress. Invest in materials designed for durability and resistance to environmental factors. High-grade PE pipes, like PE100-RC, offer enhanced resistance to slow crack growth and fatigue. This significantly reduces the risk of future leaks.
Third, protect PE pipes from external damage. Bury pipes at appropriate depths to shield them from heavy loads and ground movement. Use proper bedding and backfill materials to provide stable support. This prevents stress points. Shield exposed pipes from prolonged UV radiation, which degrades polyethylene over time. Implement measures to prevent water hammer, such as installing surge arrestors. Consistent water pressure management reduces stress on pipe joints.
Finally, conduct regular inspections. Periodically check visible PE pipe sections and joints for any signs of wear, stress, or minor leaks. Early detection allows for timely intervention before small issues escalate into major problems. By following these preventative steps, property owners secure their PE pipe systems against future leaks, ensuring peace of mind and avoiding costly repairs.
Repairing Leaking PVC Pipe Joints
Property owners must address leaks in PVC pipe joints promptly. This prevents extensive water damage and maintains system integrity. Effective repair requires the right tools, materials, and a precise approach.
Tools and Materials for PVC Pipe Repair
Successful PVC pipe repair depends on having the correct equipment. You will need a PVC pipe cutter or a hacksaw to make clean cuts. Sandpaper, specifically medium grit, helps clean and roughen pipe surfaces. Clean rags are essential for wiping pipes. A measuring tape and marker ensure accurate cuts. For materials, gather PVC primer and cement. Epoxy putty offers a quick fix. Rubber or silicone repair tape and fiberglass resin tape provide temporary solutions. Always have replacement PVC pipe sections and fittings on hand. These include couplings or elbows, depending on the repair type.
Step-by-Step: Solvent Cementing Repair for PVC
Solvent cementing provides a durable repair for PVC pipe joints. First, prepare the work area. Ensure it remains clean, dry, and free from debris. This achieves a secure bond. Next, dry-fit the pipes and fittings. This ensures proper alignment and fit. Mark positions with a pencil for reference. Use a PVC pipe cutter to cut pipes to the desired length. This ensures clean, square cuts for a proper bond. Apply PVC primer to the outside of the pipe and the inside of the fitting. Allow it to dry according to manufacturer instructions. Stir the PVC pipe cement thoroughly. Apply a generous, even layer of cement to the outside of the pipe and the inside of the fitting. Quickly join the pipes and fittings together. Apply firm pressure. Twist the pipe a quarter turn as you push it into the fitting. This spreads the cement evenly. Hold the joint in place for a few seconds. This allows the cement to set. Wipe off any excess cement. Allow the joint to cure for the recommended time before pressurizing the system.
Threaded Joint Repair and Sealing for PVC Pipes
Threaded joints in PVC systems require careful attention for effective repair. These joints rely on a tight seal created by threads. Leaks often occur from improper tightening or damaged threads. To repair, first, disassemble the joint. Clean both the pipe threads and the fitting threads thoroughly. Apply new thread sealant, such as PTFE tape or pipe dope, to the male threads. Wrap the tape clockwise, ensuring full coverage. Reassemble the joint, hand-tightening first. Then, use a wrench for a final snug turn. Avoid over-tightening, as this can crack PVC fittings. Under-tightening results in a loose connection that leaks under pressure.
Preventing Future PVC Pipe Joint Leaks
Property owners prevent future PVC pipe joint leaks through proactive measures. They ensure the longevity and reliability of their plumbing systems. Implementing consistent maintenance and adhering to proper installation practices are crucial.
First, always prioritize correct installation. Technicians must follow manufacturer guidelines precisely for all PVC pipe and fitting installations. They use the correct solvent cement and primer for the specific PVC material. Proper preparation of pipe ends, including cleaning and deburring, ensures strong, homogeneous bonds. Avoid common installation errors like insufficient primer application or twisting pipes during insertion. These mistakes significantly weaken joints and lead to premature failure.
Second, select high-quality PVC materials. Inferior pipes and fittings often contain hidden defects. These defects can develop into leaks under operational stress. Invest in materials designed for durability and resistance to environmental factors. High-grade PVC pipes offer enhanced resistance to pressure and temperature fluctuations. This significantly reduces the risk of future leaks.
Third, protect PVC pipes from external damage. Shield exposed pipes from prolonged UV radiation, which degrades PVC over time. Insulate systems in areas with freezing conditions. Freezing water expands and causes splits or loosened joints. Bury pipes at appropriate depths to shield them from heavy loads and ground movement. Use proper bedding and backfill materials to provide stable support. This prevents stress points. Implement measures to prevent water hammer, such as installing surge arrestors. Consistent water pressure management reduces stress on pipe joints.
Finally, conduct regular inspections. Periodically check visible PVC pipe sections and joints for any signs of wear, stress, or minor leaks. Early detection allows for timely intervention before small issues escalate into major problems. By following these preventative steps, property owners secure their PVC pipe systems against future leaks. They ensure peace of mind and avoid costly repairs.
Advanced Troubleshooting for PPR Pipe Systems and Professional Help
Property owners often face complex plumbing issues. These issues require more than basic repairs. Advanced troubleshooting techniques help identify hidden problems. Knowing when to call a professional saves time and prevents further damage.
Dealing with Hidden Leaks in PPR Pipes
Hidden leaks pose a significant challenge. They often go unnoticed until they cause extensive damage. Advanced technologies help locate these elusive leaks.
- Acoustic Emission Sensors detect sound waves from escaping fluid. These sensors identify elastic waves from pressure drops. They use aquaphones, geophones, and acoustic correlation.
- Fiber Optic Sensing uses cables to detect changes in the pipeline’s environment. These changes can indicate a leak.
- Infrared Thermography uses cameras to find temperature differences. These differences on the pipe surface often point to fluid leaks.
- Ground Penetration Radar (GPR) images the subsurface. It identifies anomalies like changes in soil moisture. These anomalies could be caused by leaks. These methods provide precise location data. They minimize the need for destructive searches.
Troubleshooting Persistent Low Water Pressure
Low water pressure can signal various issues. It might indicate a partially closed main valve. It could also mean a clogged aerator. However, persistent low pressure often points to a larger problem. This includes significant leaks or blockages within the system. A sudden drop in water pressure is a key indicator. It suggests a serious issue requiring investigation.
Recognizing When Professional Help is Essential
Certain signs clearly indicate the need for professional plumbing help. You might discover water stains on walls or ceilings. Mold growth also suggests hidden moisture. A water meter that moves when no water is in use confirms a hidden leak. Slab leaks show as warm spots on the floor or high water bills. Damp patches and musty smells indicate trapped moisture. These symptoms point to hidden pipe joint leaks. Drain leaks causing sewer backup or burst pipes create immediate hazards. These hazards include contamination, flooding, and electrical risks. Unusual sounds, like a noisy toilet or persistent hissing in walls, also warrant expert attention. Professionals possess the tools and expertise for these complex problems.
Maintenance Schedule for Preventing Leaks
Implementing a robust maintenance schedule is paramount for preventing leaks and ensuring the longevity of any plumbing system. Proactive measures significantly reduce the risk of costly repairs and water damage. Property owners must establish a consistent routine for inspections and upkeep.
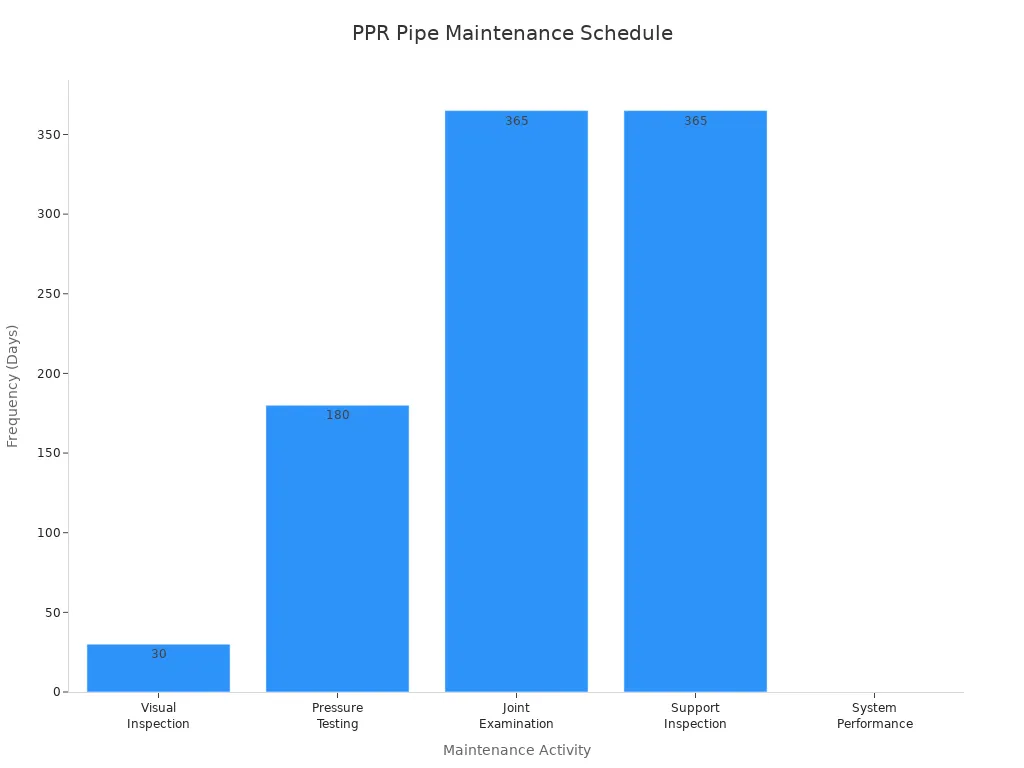
A structured approach to maintenance helps identify potential issues before they escalate. This table outlines recommended frequencies for critical activities:
| Maintenance Activity | Frequency | Critical Checks |
|---|---|---|
| Visual Inspection | 30 days | Stress whitening, deformation, scratches |
| Pressure Testing | 6 months | Pressure retention, joint integrity |
| Joint Examination | 12 months | Bead condition, crack development |
| Support Inspection | 12 months | Clamp condition, alignment |
| System Performance | Continuous | Pressure drops, air quality |
This chart further illustrates the frequency of these essential tasks:
Regular inspections are crucial. Conduct visual checks every 3–6 months. Look for signs of water stains, dampness, discoloration, bulging, cracks, or soft spots near joints. These indicators often reveal hidden problems. Periodically clean pipes with mild detergents. Perform leak tests, including pressure testing, to identify hidden leaks.
Proper installation forms the foundation of a leak-free system. Qualified professionals must install pipes and fittings. They use correct fittings and tools. Maintain cleanliness of pipes, fittings, and the work area. Ensure proper welding techniques, following manufacturer guidelines. Provide adequate support and clamping. Account for thermal expansion with loops or joints in long pipe runs. This prevents stress on joints from vibrations or thermal expansion.
Long-term performance monitoring is also vital. Conduct regular system audits to assess condition. Use data logging to monitor temperature, pressure, and flow rates. This helps identify issues early. Maintain system temperature below 70–90°C. Use pressure regulators. Insulate hot water lines. Be aware of chemical compatibility. Monitor water quality to avoid damage from contaminants. Address leaks promptly using approved methods. Keep detailed records of installation, inspections, and repairs. This comprehensive approach ensures the system’s reliability and prevents future leaks.
This guide empowers property owners to effectively diagnose and repair PPR, PE, and PVC pipe leaks. You ensure the longevity and efficiency of your plumbing system. Regular inspection and proper repair techniques are crucial. They offer significant long-term benefits:
- Cost Savings: Prevent minor issues from escalating into expensive emergencies.
- Structural Integrity and Hygienic Conditions: Maintain your home’s foundation and minimize mold growth.
- Environmental Impact: Enhance water flow, reduce waste, and conserve water.
- Extended Lifespan: Address wear and tear early to prolong system life.
- Improved Efficiency and Property Value: Lead to lower utility bills and increased property value.
FAQ
How long do PPR pipes typically last?
PPR pipes offer exceptional durability. They can last for over 50 years with proper installation and maintenance. High-quality materials and correct fusion techniques ensure a long, leak-free service life. Property owners invest in a reliable plumbing system when they choose PPR.
Is it expensive to repair a PPR pipe leak?
The cost of PPR pipe repair varies. It depends on the leak’s severity and location. Early detection and prompt action minimize repair expenses. Ignoring small leaks can lead to extensive damage and higher costs. Property owners save money by addressing issues quickly.
When should property owners call a professional for PPR pipe leaks?
Property owners should call a professional for complex or hidden leaks. Persistent low water pressure, unexplained water stains, or mold growth indicate serious issues. Professionals possess specialized tools and expertise. They accurately diagnose and effectively repair problems, ensuring lasting solutions.
What is the best way to prevent future PPR pipe leaks?
Preventing future leaks involves regular maintenance and proper installation. Conduct visual inspections frequently. Ensure correct fusion welding techniques during installation. Manage water pressure and protect pipes from extreme temperatures. These proactive steps significantly extend the system’s lifespan and prevent costly repairs.
Tip: Donsen recommends using high-quality PPR pipes and fittings. This ensures optimal performance and reduces the risk of future leaks.
See Also
Best Air Fryer Options Beyond BrandsMart: A 2024 Buying Guide
Essential Air Fryer Pan Accessories to Enhance Your Cooking Experience
Effortlessly Prepare Boneless Pork Ribs in Your Air Fryer: A Simple Guide
Mastering Your Sur La Table Air Fryer: A Comprehensive Usage Tutorial
Air Fryer Method: Perfectly Cooking Frozen Ravioli for a Quick Meal